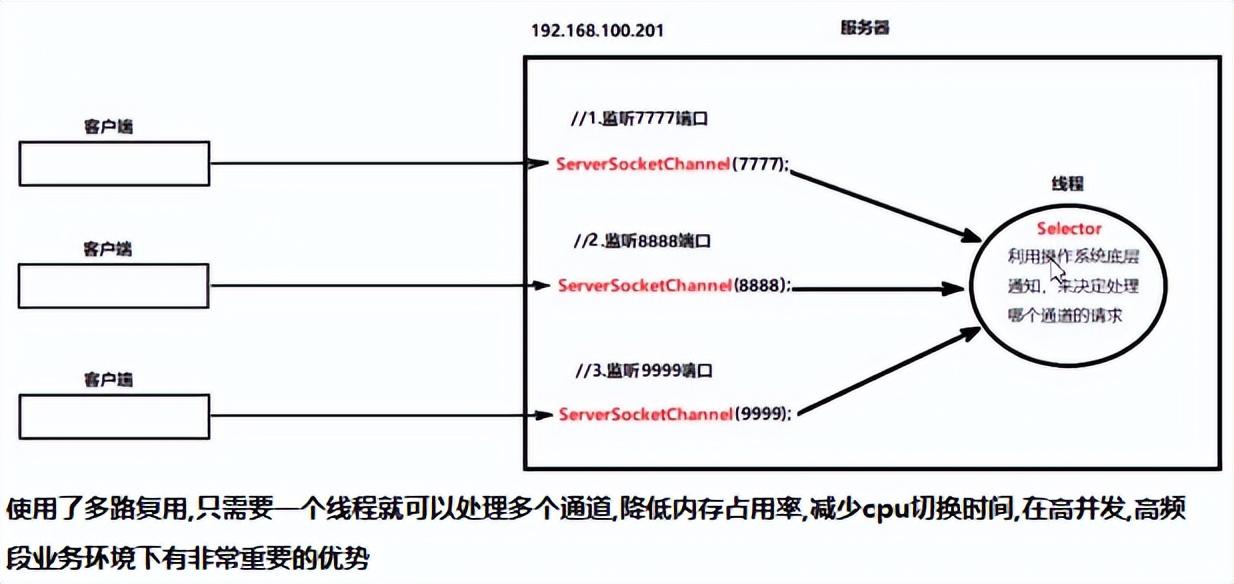
NIO概述NIO介绍传统IO流(java.io):读写操作结束前,处于线性阻塞,代码简单,安全,性能低 NIO:支持非阻塞式编程,性能更有优势,但代码编写较为复杂。概念理解同步(synchronous):一条线程执行期间,其他线程就只能等待。 异步(asynchronous):一条线程在执行期间,其他线程无需等待。 阻塞(blocking):当前任务未执行结束,会阻碍后续任务的执行。 非阻塞(non-blocking):当前任务未执行结束,不会阻碍后续任务的执行。IO流与NIO的区别NIO是面向缓冲区,IO 面向流。 NIO是非阻塞的,IO是阻塞的。 NIO可以使用选择器,IO不涉及选择器。NIO组成Buffer(缓冲区,负责读写数据,类似火车)、 Channel(通道 ,负责传输,类似铁轨) Selector:(选择器,负责调度通道,类似指挥中心)Buffer介绍理解:实质相当于普通IO流中的数组,负责数据的存和取。但是它提供了对数据的结构化访问,可以跟踪系统的读、写进程。 常见分类:ByteBuffer、CharBuffer、DoubleBuffer、FloatBuffer、IntBuffer、LongBuffer、ShortBuffer核心属性capacity:代表缓冲区的最大容量。 limit:代表剩余(可存入/可读取)数量 position:代表(存入/读取)位置 mark:标记当前position的位置。 四个属性关系:mark <= position <= limit <= capacity构造方法(以ByteBuffer为例)static ByteBuffer allocate(int capacity)分配一个新的字节缓冲区。 static ByteBuffer allocateDirect(int capacity) 分配新的直接字节缓冲区。 static ByteBuffer wrap(byte[] array)将 byte 数组包装到缓冲区中。常用方法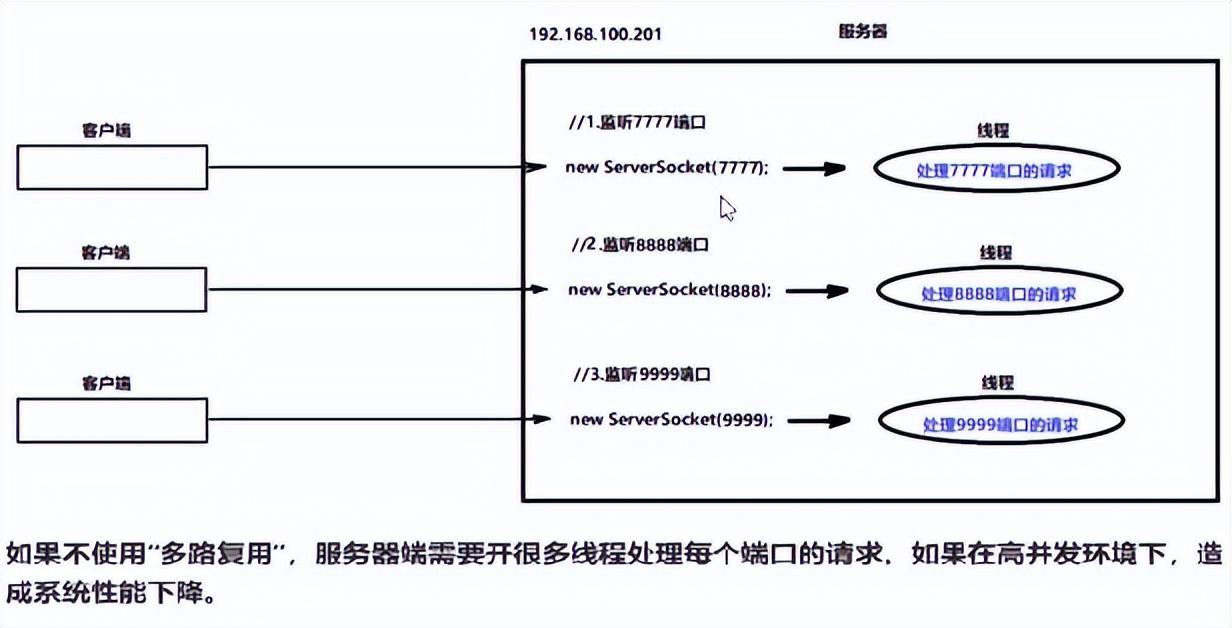 多路复用:服务器端利用一个线程处理多个端口的访问请求,节省CPU资源,提高程序运行效率,高并发状态下有明显优势。
 核心知识
核心知识
获取属性值
capacity():获取缓冲区的最大容量。 limit():获取剩余(可存入/可读取)数量 position():获取(存入/读取)位置 mark():标记当前position的位置。存取数据
put(Xxx[] xxx) 存入数据到缓冲区中,position >= limit不可写。 get() 获取缓冲区的position位置数据,并将position后移,position >= limit不可读。核心方法
flip()翻转此缓冲区(limit=capacity-postion,postion=0),清除标记,用于读取模式。 clear()清除此缓冲区(limit=capacity,postion=0),清除标记,用于写入模式。 rewind() 倒回这个缓冲区(position=0),清除标记。 reset() 将此缓冲区的位置重置为先前标记的位置(position=mark)。演示代码public class Test01Buffer { public static void main(String[] args) { //新建缓冲区对象(默认为写入模式) ByteBuffer b = ByteBuffer.allocate(10); //写入数据 System.out.println(“====写入模式属性状态====”); showProperty(b); System.out.println(“====读取模式属性状态====”); //切换为读取模式 b.flip(); showProperty(b); System.out.println(“====写入数据====”); b.clear(); b.put(new byte[]{1,2}); showProperty(b); System.out.println(“====读取数据====”); b.flip(); System.out.println(“position——–>” + b.position() + “,get:” + b.get()); //循环遍历通用格式 //while (b.position()<b.limit()){ // System.out.println(“position——–>” + b.position() + “,get:” + b.get()); //} System.out.println(“====重置操作位置前:记录位置====”); showProperty(b); //记录位置 b.mark(); System.out.println(“====重置操作位置前:获取新数据====”); System.out.println(“position——–>” + b.position() + “,get:” + b.get()); showProperty(b); System.out.println(“====重置操作位置后====”); b.reset(); showProperty(b); System.out.println(“====倒回缓冲区前====”); showProperty(b); System.out.println(“====倒回缓冲区后====”); b.rewind(); showProperty(b); } //展示参数 public static void showProperty(ByteBuffer b) { //容量 System.out.println(“capacity:” + b.capacity()); //可存放个数 System.out.println(“limit:” + b.limit()); //下一个存入位置 System.out.println(“position:” + b.position()); } }Channel入门介绍理解 Channel理解为通道,包含了写入和读取的操作,可以理解为IO中的流对象。Channel负责读写,Buffer负责存取。 常见分类:FileChannel、SocketChannel、ServerSocketChannel、DatagramChannelChannel与IO流区别Channel是双向的,既可以读又可以写,而IO是单向的 Channel可以进行异步的读写,IO是不支持异步。 Channel的读写必须通过buffer对象,IO通过流可以直接读写。构造方法(以FileChannel为例 )在IO流FileXXX字节流中提供了getChannel()方法获取FileChannel对象。 FileChannel getChannel() 通过FileXXX字节流的方法获取对象常用方法 int read(ByteBuffer dst):将数据读取到缓冲区中 int write(ByteBuffer src):将数据从缓冲区中写出到指定位置演示代码public class Test02FileChannel { public static void main(String[] args) throws IOException { FileChannel in = new FileInputStream(“D:\image.jpg”).getChannel(); FileChannel out = new FileOutputStream(“D:\imageCopy.jpg”).getChannel(); ByteBuffer b = ByteBuffer.allocate(10); int len = -1; while ((len = in.read(b)) != -1) { b.flip(); out.write(b); b.clear(); } in.close(); out.close(); } }ChannelTCP协议编程介绍NIO中通过SocketChannel与ServerSocketChannel替代TCP协议的网络通信编程客户端通道操作SocketChannel 客户端通道,用于读写TCP网络协议数据 获取对象 public static SocketChannelopen() 连接服务器 boolean connect(SocketAddress remote) SocketAddress是抽象类,使用其子类InetSocketAddress创建的对象。InetSocketAddress(String ip,int port) 等待客户端连接 SocketChannel accept()服务端通道操作ServerSocketChannel 服务端通道,用于服务端监听TCP连接 获取对象 public static ServerSocketChannel open() 绑定端口号 ServerSocketChannel bind(SocketAddress local)服务器代码public class Test03ServerByChanner { public static void main(String[] args) throws IOException { //获取服务器通道对象 ServerSocketChannel serverSocket = ServerSocketChannel.open(); //绑定端口 ServerSocketChannel socket = serverSocket.bind(new InetSocketAddress(8888)); SocketChannel server = socket.accept(); //接收数据 System.out.println(“服务端开始接收数据……”); ByteBuffer buffer = ByteBuffer.allocate(1024); int len = -1; while ((len = server.read(buffer)) != -1) { //翻转缓冲区,读取数据 buffer.flip(); System.out.println(“server:” + new String(buffer.array())); buffer.clear(); } System.out.println(“服务端开始反馈数据……”); buffer.put(“数据收到了”.getBytes()); //翻转缓冲区,读取数据 buffer.flip(); //取出缓冲区数据,写会给客户端 server.write(buffer); server.close(); } }客户端代码public class Test03ClientByChannel { public static void main(String[] args) throws Exception { //获取连接对象 SocketChannel client = SocketChannel.open(); //连接服务器 client.connect(new InetSocketAddress(“localhost”, 8888)); //发送数据 System.out.println(“客户端开始发送数据……”); ByteBuffer buffer = ByteBuffer.allocate(1024); buffer.put(“服务器,你好啊”.getBytes()); //翻转缓冲区,读取数据 buffer.flip(); //从缓冲区取出数据写入通道 client.write(buffer); client.shutdownOutput(); //等待反馈 buffer.clear(); int len = -1; while ((len = client.read(buffer)) != -1) { buffer.flip(); System.out.println(“client:” + new String(buffer.array())); buffer.clear(); } //关闭客户端 client.close(); } }多路复用介绍非多路复用:服务器端需要为每个端口的每次请求,开辟线程处理业务,高并发状态下会造成系统性能下降。1.通过Selector中的open方法,获取选择器对象
public static Selector open():获取Selector对象2.通过Channel中的方法,注册通道给选择器
①创建通道对象,设置通道屏蔽模式
void configureBlocking(boolean block)②将通道注册给选择器,并设置该通道的关注事件
SelectionKey register(Selector sel,int ops) Selector sel 要注册的选择器 ops表示注册的事件类型,在 SelectionKey类中提供的四种类型实现。 SelectionKey.OP_ACCEPT : 接收连接就绪事件,表示服务器监听到了客户连接,服务器可以接收这个连接了 SelectionKey.OP_CONNECT:连接就绪事件,表示客户端和服务器的连接已经建立成功 SelectionKey.OP_READ: 读就绪事件,表示通道中有了可读的数据,可以执行读操作了 SelectionKey.OP_WRITE: 写就绪事件,表示已经可以向通道中写数据了 注意事项 被注册的Channel必须支持异步模式,否则异步NIO就无法工作,例如FileChannel(没有异步模式)不能被注册到Selector。 ServerSocketChannel在注册时,只能使用以OP_ACCEPT状态注册,否则抛出异常。 SocketChannel在注册时,不支持OP_ACCEPT状态注册。3.通过Selector中的方法,获取事件
int select():将事件存放至事件集合,返回已就绪事件个数。如果没有新的已就绪事件,该方法将持续阻塞。 Selector的Set<SelectionKey> selectedKeys():返回选择器的已就绪事件集 Set<SelectionKey> keys():返回选择器的感兴趣事件集(已注册的事件数)。 SelectionKey概述 SelectionKey 代表一个通道在Selector的注册事件关系键。 当Selector通知某个传入事件时,是通过对应 SelectionKey 进行传递的。 想要取消已注册的通道事件,需要通过SelectionKey的cancel方法完成。 SelectionKey中属性: Interest set:兴趣集,表示已注册的事件集合,下一次调用方法,将测试是否有此事件的加入。 通过SelectionKey的 int interestOps() 方法,可以获取当前 SelectionKey的感兴趣事件。 Ready set:准备集,表示已准备就绪的事件集合。 通过SelectionKey的 int readyOps()方法,可以获取当前 SelectionKey的准备就绪事件。 Channel:事件对应的通道。 通过SelectionKey的 SelectableChannel channel()方法,可以获取当前 SelectionKey的表示的通道。 Selector:事件绑定的选择器。 通过SelectionKey的 Selector selector() 方法,可以获取当前 SelectionKey的绑定的选择器。 Attached:事件对象的附加信息。 通过 SelectionKey的 Object attach(Object ob)方法,将给定对象附加到此键。 通过 SelectionKey的 Object attachment()方法,检索当前的附件。 通过 Channel的SelectionKey register(Selector sel,int ops,Object ob)方法,可以附件及获取附加信 SelectionKey迭代器4.通过SelectionKey中的方法,判断事件
isAcceptable() 是否有准备好接收新连接 isConnectable() 是否有完成连接状态 isReadable() 是否有处于可读取状态 isWritable() 是否有处于可写入状态 isValid() 是否是有效的键步骤1.获取选择器对象 2.创建通道对象,设置异步,注册到选择器 3.定义死循环,重复检查是否有新事件触发(Selector中的int select()方法) 3.1.如果触发新时间,获取所有触发事件集(Selector的Set<SelectionKey> selectedKeys()方法) 3.2.获取触发事件集合的迭代器 3.3.遍历迭代器,获取所有触发的事件 3.3.1判断触发事件类型,指向相应操作 举例 if (selectionKey.isAcceptable()) {} 3.3.2删除已完成操作的触发事件 (Iterator的remove()方法)服务器端代码public class Test04ServerBySelector { public static void main(String[] args) throws IOException, InterruptedException { //获取一个选择器 Selector selector = Selector.open(); //创建三个服务器通道,监听三个端口 ServerSocketChannel serverChannel1 = ServerSocketChannel.open(); serverChannel1.bind(new InetSocketAddress(6666)); serverChannel1.configureBlocking(false); ServerSocketChannel serverChannel2 = ServerSocketChannel.open(); serverChannel2.bind(new InetSocketAddress(7777)); serverChannel2.configureBlocking(false); ServerSocketChannel serverChannel3 = ServerSocketChannel.open(); serverChannel3.bind(new InetSocketAddress(8888)); serverChannel3.configureBlocking(false); //将三个服务器通道注册给选择器 serverChannel1.register(selector, SelectionKey.OP_ACCEPT); serverChannel2.register(selector, SelectionKey.OP_ACCEPT); serverChannel3.register(selector, SelectionKey.OP_ACCEPT); //循环监听三个通道 while (true) { System.out.println(“——–“); System.out.println(“等待客户端连接…”); //获取触发的事件个数 int keyCount = selector.select();//阻塞式方法 System.out.println(“有一个客户端连接成功…”); System.out.println(“已就绪事件个数=” + keyCount); System.out.println(“注册通道数量=” + selector.keys().size()); //获取触发事件集 Set<SelectionKey> selectionKeys = selector.selectedKeys(); System.out.println(“触发事件数量=” + selectionKeys.size()); //获取事件集迭代器 Iterator<SelectionKey> it = selectionKeys.iterator(); //遍历事件集 while (it.hasNext()) { //获取注册键 SelectionKey selectionKey = it.next(); //使用选择器完成数据读取 if (selectionKey.isAcceptable()) { //获取通道对象 ServerSocketChannel channel = (ServerSocketChannel) selectionKey.channel(); //获取服务器与客户端的连接 SocketChannel server = channel.accept(); //设置非阻塞 server.configureBlocking(false); //注册读取事件 server.register(selector, selectionKey.OP_READ); //selectionKey.interestOps(selectionKey.OP_READ); } else if (selectionKey.isReadable()) { //获取客户端数据 ByteBuffer buffer = ByteBuffer.allocate(1024); SocketChannel server = (SocketChannel) selectionKey.channel(); server.read(buffer); buffer.flip(); String content = new String(buffer.array(), 0, buffer.limit()); System.out.println(“客户端发送的数据:” + content); //关闭资源 server.close(); } //删除当前触发事件 it.remove(); } System.out.println(“休息1秒,等待下一次操作…”); Thread.sleep(1000); } } }客户端代码public class Test04ClientByChannel { public static void main(String[] args) { int[] ports = {7777, 8888, 6666}; for (int i = 0; i < ports.length; i++) { int port = ports[i]; new Thread(new Runnable() { @Override public void run() { try { //创建客户端通道 SocketChannel client = SocketChannel.open(); //连接服务器 client.connect(new InetSocketAddress(“localhost”, port)); //发送数据 ByteBuffer buffer = ByteBuffer.allocate(1024); buffer.put(“你好啊,哈哈哈”.getBytes()); buffer.flip(); client.write(buffer); //关闭资源 client.close(); } catch (IOException e) { e.printStackTrace(); } } }).start(); } } }异步非阻塞交互(AIO)介绍支持异步操作的NIO体系 常见分类: AsynchronousSocketChannel 客户端异步通道 AsynchronousServerSocketChannel服务端异步通道 AsynchronousFileChannel文件异步通道 AsynchronousDatagramChannel 数据异步通道CompletionHandler回调接口 void completed(V result,A attachment);异步操作成功被回调。 void failed(Throwable exc,A attachment);异步操作失败时被回调。AsynchronousSocketChannel常用方法public static AsynchronousSocketChannel open();打开异步服务器套接字通道。 void read(ByteBuffer dst,A attachment,CompletionHandler<Integer,? super A> handler) 读取数据。 void write(ByteBuffer src,A attachment,CompletionHandler<Integer,? super A> handler) 写出数据AsynchronousServerSocketChannel常用方法public static AsynchronousServerSocketChannel open()打开异步服务器套接字通道。 AsynchronousServerSocketChannel bind(SocketAddress local,int backlog) ;绑定服务端IP地址,端口号 void accept(A attachment,CompletionHandler<AsynchronousSocketChannel,? super A> handler) ;接收连接服务器端代码package com.NIO.src.com.itheima; import java.io.IOException; import java.net.InetSocketAddress; import java.nio.ByteBuffer; import java.nio.channels.AsynchronousServerSocketChannel; import java.nio.channels.AsynchronousSocketChannel; import java.nio.channels.CompletionHandler; import java.util.concurrent.ExecutionException; public class Test05ServerBySynChanner { //如果为true,服务器结束。 static boolean isOver = false; public static void main(String[] args) throws IOException, ExecutionException, InterruptedException { //获取服务器通道 AsynchronousServerSocketChannel serverChanner = AsynchronousServerSocketChannel.open(); //绑定端口号 serverChanner.bind(new InetSocketAddress(8888)); // 获取服务器与客户端的对接 serverChanner.accept(“accept”, new CompletionHandler<AsynchronousSocketChannel, String>() { @Override public void completed(AsynchronousSocketChannel result, String attachment) { try { isOver=true; System.out.println(“接受了一个连接:” + result.getLocalAddress() .toString()); // 给客户端发送数据并等待发送完成 result.write(ByteBuffer.wrap(“From Server:我是服务器”.getBytes())) .get(); ByteBuffer readBuffer = ByteBuffer.allocate(128); // 阻塞等待客户端接收数据 result.read(readBuffer).get(); System.out.println(new String(readBuffer.array())); } catch (InterruptedException e) { e.printStackTrace(); } catch (ExecutionException e) { e.printStackTrace(); } catch (IOException e) { e.printStackTrace(); } } @Override public void failed(Throwable exc, String attachment) { isOver=true; System.out.println(“连接失败”); } }); //由于异步执行,所以上述操作不会阻碍当前循环的执行。 while (true) { if (isOver) { break; } System.out.println(“服务端:先干为敬”); } } } 客户端代码public class Test05ClientBySynChannel { public static void main(String[] args) throws IOException, ExecutionException, InterruptedException { //创建客户端通道对象 AsynchronousSocketChannel client = AsynchronousSocketChannel.open(); //与服务器进行连接 client.connect(new InetSocketAddress(“localhost”, 8888), “connect”, new CompletionHandler<Void, String>() { @Override public void completed(Void result, String attachment) { System.out.println(“连接到服务器成功!”); try { // 给服务器发送信息并等待发送完成 client.write(ByteBuffer.wrap(“From client:我是服务器”.getBytes())).get(); ByteBuffer readBuffer = ByteBuffer.allocate(128); // 阻塞等待接收服务端数据 client.read(readBuffer).get(); System.out.println(new String(readBuffer.array())); } catch (InterruptedException e) { e.printStackTrace(); } catch (ExecutionException e) { e.printStackTrace(); } } @Override public void failed(Throwable exc, String attachment) { System.out.println(“连接到服务器失败”); } }); } }免责声明:文章内容来自互联网,本站仅作为分享,不对其真实性负责,如有侵权等情况,请与本站联系删除。
转载请注明出处:看了就懂的NIO深入使用详解 https://www.dachanpin.com/a/cyfx/11410.html